As we all know, Adobe Lightroom Classic is the renamed version of the Lightroom application. It is a desktop-focused digital photography product that was developed to help you deal with your photography workflows. But sometimes, you may lose your important photos from Lightroom Classic due to some unexpected reasons. In this blog, you will learn how to restore deleted photos in Lightroom Classic and it brings your images to life with a fleet of editing capabilities.
To recover missing photos from Lightroom classic , we recommend this tool:
This software will restore data from corrupted, formatted, encrypted storage media and works in all data loss situations. Now recover your lost and deleted data in 3 easy steps:
- Try this Media File Recovery Tool rated Excellent on Pcmag.com.
- Select the storage media from which you want to restore the media files & click Scan.
- Preview the recoverable files, select the items you want to recover and click Recover to save the files at desired location.
Quick Navigation:
- How Do I Recover Lost Photos In Lightroom?
- How to Recover Photos from Lightroom Backup Drive?
- Restore Deleted Photos in Lightroom Classic from Recycle Bin
- Find Missing Folders from the Lightroom Classic
- Rename Pictures As Referenced via Lightroom Classic
- Try To Move Photos Or Folders Back To Its Accurate Place
- How To Find A Missing Folder In Lightroom?
How Do I Recover Lost Photos In Lightroom?
Lightroom Photo Recovery Tool is the best option that you can try to recover missing photos from Lightroom classic, so you need not worry, just try it. It would first scan the drive to find missing photos in Lightroom, once the Lightroom recovery is complete it will show the result on the File type view.
Lightroom file recovery software will retrieve all the pictures that have been deleted from any hard drive. The best thing about this tool is that it is compatible with both platforms, i.e., Windows as well as Mac.
emid emid
emid
* Free version of the program only scans and previews recoverable items.
Let me make it very clear why I am recommending you to use this software because it has lots of features that make this tool outstanding like:
- Recovers deleted, missing, or lost photos from Lightroom Classic
- Preview recoverable media files within the software, before recovering them on the system
- 100% read only. Safe and secure to use.
So what are you waiting for? Just download, and install Photo Recovery Tool…Try the step-by-step guide to learn how to recover missing photos from Lightroom Classic.
Restore Deleted Photos in Lightroom Classic- Video Guide
How to Recover Photos from Lightroom Backup Drive?
If your Lightroom photos missing from collection then you can use the File History backup drive to Lightroom Show Missing Photos. To do so follow the below steps:
- Firstly, connect the File History backup drive on the PC.
- Next, press on the key Windows logo and then type the ‘file history.’
- After that, choose the “Restore your files with File History.
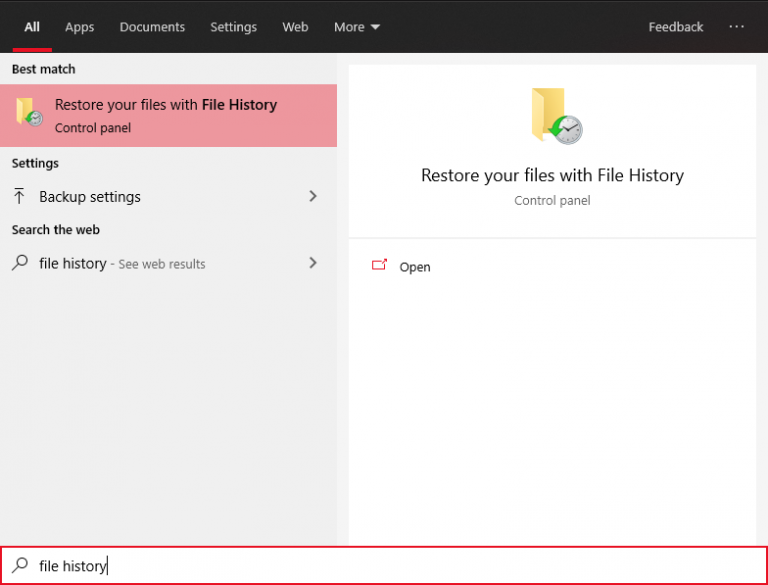
- Under File History window, search for the images that you need to get back from a search box.
- Now, navigate forward or backward in the time to get the right version and then you have to click the Restore.
- After restoring Lightroom catalog missing photos, then close your File History window.
Restore Deleted Photos in Lightroom Classic from Recycle Bin
When you find that Lightroom source files are missing, the first thing you should do is to check your recycle bin for restoring the Lightroom folders disappeared pictures. For this, you need to follow the steps below:
- First of all, open your Recycle Bin simply by double-clicking on its icon on your Desktop.
- Find and then choose whatever images or files you want to restore.
- After this, tap and hold the selection.
- Next, you have to choose the Restore.
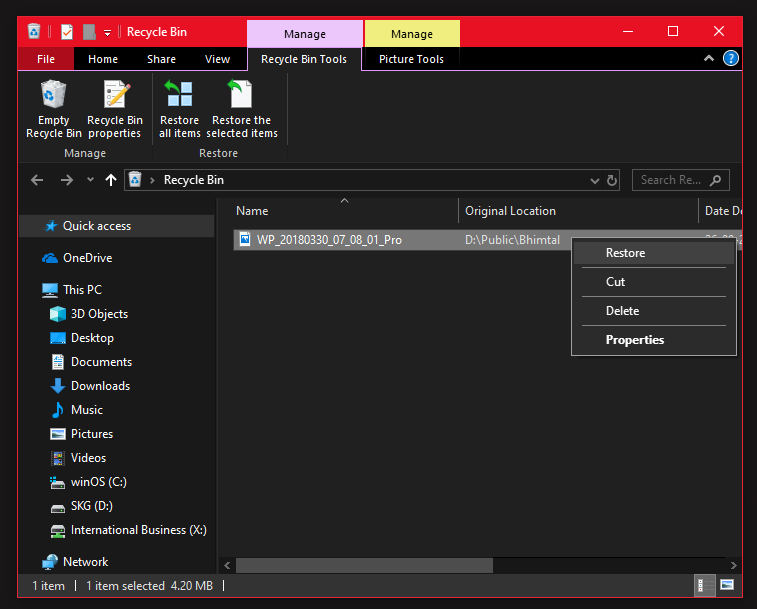
- Lastly, the Recycle Bin will then recover missing pictures to their Original place.
Find Missing Folders from the Lightroom Classic
When your folder in the Folders panel of the Lightroom Classic has a question-mark icon (?), and then follow the below steps to place the missing folder from the storage:
Step 1: First of all, right click on folders that have a question mark icon.
Step 2: Then, from a context menu, select the “Find Missing Folder“.

Step 3: After that, navigate to the file path and then click on the Choose.
Rename Pictures As Referenced via Lightroom Classic
If you’ve changed the name of the linked picture from the File Explorer then you require renaming it with its proper name, as referenced in the Lightroom Classic. To do so, follow these steps:
Step 1: At first, from a previous location of the lost image in the Lightroom Classic, note down the place and name of an image.
Step 2: Next, navigate to the position and rename the picture as referenced in the software.
Try To Move Photos Or Folders Back To Its Accurate Place
In case, if you’ve moved a linked folder or any contained picture by using the File Explorer then you can otherwise place it in its correct referenced place rather than indicating the new place from the Lightroom Classic. Simply follow the below instructions:
- Locate the last recognized place of your missing pictures from the Lightroom Classic.
- After this, open the File Explorer and choose “This PC” from a left pane
- Next, type a name of file or folder in Search box
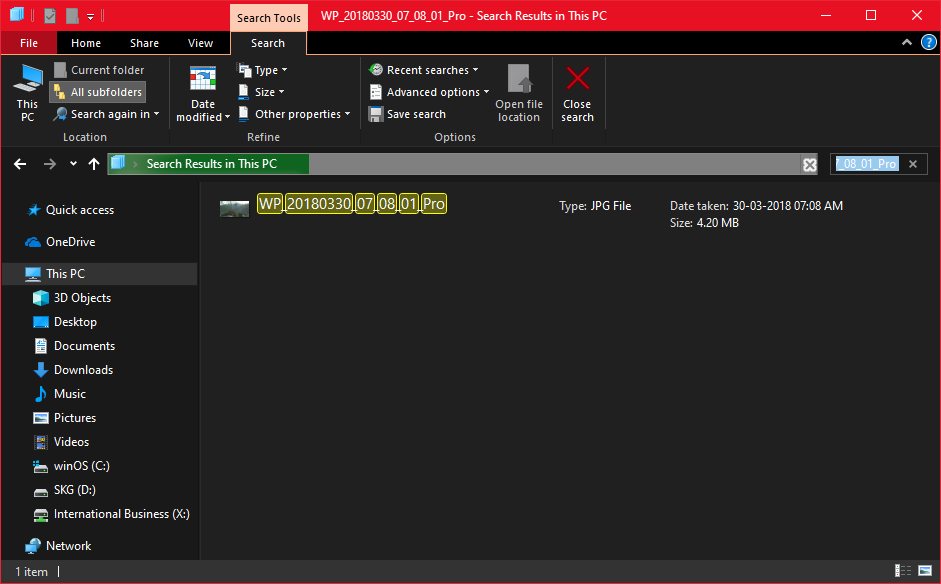
- Now, choose a file or folder, then click the “Open file location.”
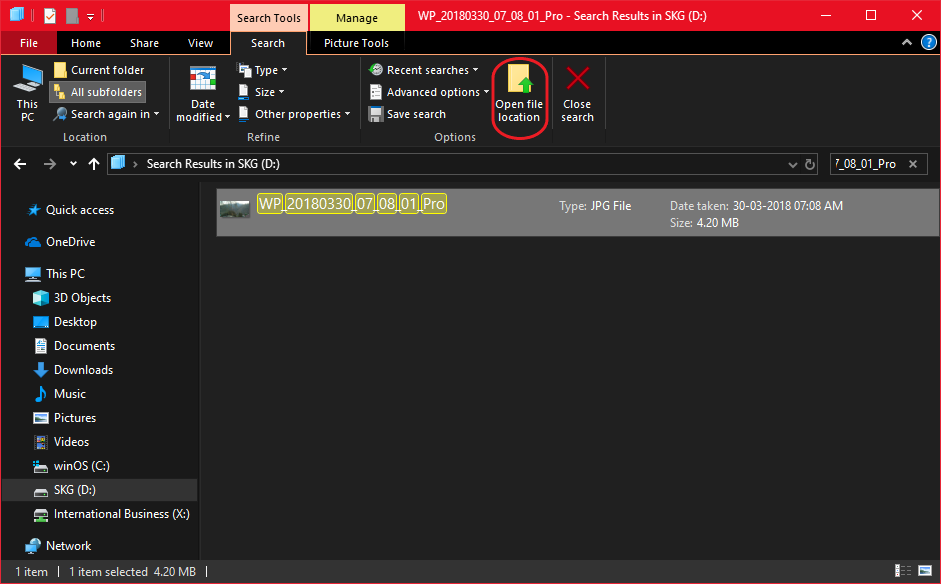
- Then, move the photo or folder to its accurately referenced place.
How To Find A Missing Folder In Lightroom?
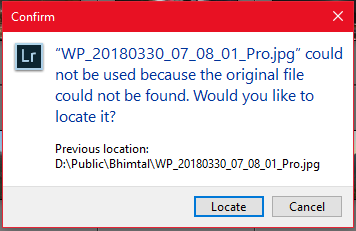
If your photos in a Grid View of the Lightroom Classic have an exclamation-mark icon (!), then follow the below instructions to find the lost photos from the storage drive and then restore the links to a catalog:
- First of all, click on the exclamation mark icon there on a thumbnail of an image.
- After this, from a dialog box, note down the name from the last location of a missing picture.
- Then, press the Windows key and type the missing picture’s name to search by Taskbar.
- Next, when you locate the picture, note its current place.
- On the dialog box, you have to click on Locate.
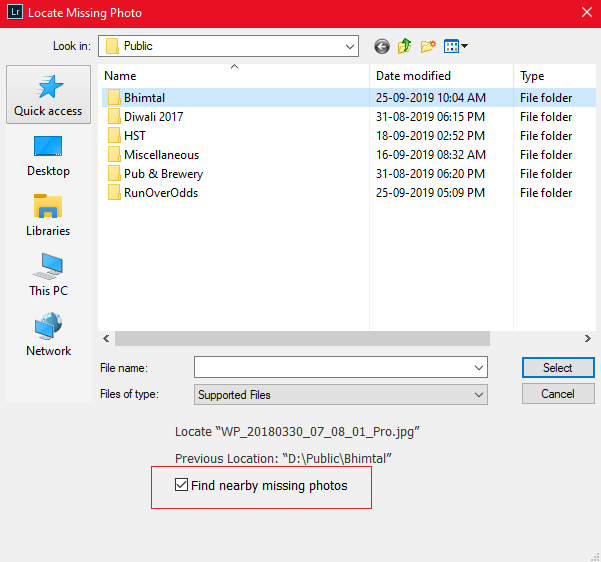
- Now, navigate to the renowned file path, and then you need to click on Select.
- Lastly, in the place dialog box, make sure “Find nearby missing photos” is chosen.
How to Prevent Missing Photos?
Well, prevention is better than cure. So, by following the below preventing tips you can avoid photo loss in Lightroom:
- Always make changes through Lightroom Classic to avoid the referencing error.
- Do not delete the original files from the hard drive.
- Never try to use Synchronize Folder to delete files and import them again at their new location as you will lose all of your Lightroom settings.
- Keep a photo recovery tool handy to retrieve deleted images from a formatted hard drive.
The FAQ (Frequently Asked Questions)
Can I Just Buy Lightroom Classic?
YES, you can buy Lighroom Classic, it is only available by subscription. But, the Lightroom 6 (the previous version) is no longer available to purchase outright.
Where Did My Photos Go in Lightroom?
The photos that you’ve imported into Lightroom are situated where you asked for them to be located when you imported them into Lightroom. If you have selected Copy as DNG, Copy or Move while importing pictures into Lightroom then those images will be stored on your disk in the folder that you asked for them to be placed in.
How Do I Import Photos to Lightroom Classic?
Well, you can import photos to Lightroom classic by following the below steps:
- Initially, insert the SD Card in the Card Reader or attach your PC
- Next, open the Lightroom Import Dialog Box
- Select the Import Source
- Then, tell Lightroom How to Add Photos to Catalog
- After that, select the picture or video files to Import
- Now, Choose the Destination for the Photos
- Simply, click on the Import.
What Is the Newest Version of Lightroom Classic?
Adobe Photoshop Lightroom Classic CC (unofficially: version 7.0) is the most recent version of Lightroom classic.
How Do I Move Photos from Email to Lightroom?
Lightroom works with Apple Mail, just drag the image out of the message window and drop into Lightroom or onto the Lightroom icon in the Dock. With Apple Mail, you must ensure to choose the Copy import option and specify where on your drive you want to store that picture permanently.
Time to Verdict
There are numerous reasons for the missing photos in Lightroom deletion. But after reading this blog, I hope the specified methods to your query will provide you with the best resolution to recover missing photos from Lightroom Classic.
Hence, without wasting your time making use of the Lightroom Recovery Software, you can recover deleted Lightroom classic data with ease.
And I tried my level best to put together the best possible ways and methods to sort out your issue. So, now Lightroom photo recovery has become very easy.

Taposhi is an expert technical writer with 5+ years of experience. Her in-depth knowledge about data recovery and fascination to explore new DIY tools & technologies have helped many. She has a great interest in photography and loves to share photography tips and tricks with others.