Distorted, flashing or skewed images can frustrate users, especially when working on important tasks or enjoying entertainment. However, flashing image issues manifest in numerous ways. In this helpful guide, you will learn the major factors for this issue and how to fix it to ensure smooth, high-quality visual experiences.
To fix a distorted flashing or skewed image, we recommend this tool:
This software will repair grainy, distorted, pixelated, blurry, greyed-out images and restores your prized memories effeciently. Now repair your corrupt or damaged photos in 3 easy steps:
- Try this Photo Repair Tool rated Great on Pcmag.com.
- Click Add File to add the photo you want to repair.
- Select Repair to start the repair process and save the repaired image on the desired location after the repair is done.
Reasons: What Causes The Distorted Flashing Or Skewed Image On A PC?
Numerous reasons can lead the distorted or skewed pictures on your system. Some of the common factors are as follows:
- Wrong display setting of a system.
- A connection of your commuter is loose/faulty.
- The existence of the virus badly affected the application in your system.
- Unfinished Window update/bugs.
- Malware/virus attack.
- Hardware issues, etc.
Here I have told you about the common reasons for distorted, flashing images on your PC computer. Now you must be thinking that how to solve distorted, flashing, or skewed images issues.
In the next section of this page, you will get some good & faster methods to resolve this problem.
How To Fix A Distorted, Flashing Or Skewed Image Issue On PC?
Try out the easy DIY troubleshooting techniques to resolve flashing image issues on the monitor:
- Check Cables & Connections Of A PC
- Restart The Computer
- Remove Connected Devices
- By Pushing A Degauss Option
- Reset the Monitor To A Default
- Adjust The Monitor’s Screen Resolution
- Update PC Drivers
- Replace The Video Card
- Reinstall The Drivers
- By Replacing The Monitor
- Automatic Solutions To Fix A Distorted, Flashing Or Skewed Image
Technique #1: Check Cables & Connections Of A PC
Many times, it happens that distorted images or other problems might occur on your desktop due to the damaged, broken, or loose cables. Therefore, in such a situation, first, you need to check the cables & connections of the system.
Make sure that all cables including a VGA or video cables are plugged into the device correctly.
Technique #2: Restart The Computer
Restarting the computer can sometimes remove the cookies from a PC and resolves several errors and issues related to PC or file formats. So, if you want to repair distorted image displays on your computer, simply reboot your device. Doing so will help you to re-initialize hardware & driver parts.
If this basic troubleshooting method won’t help you to fix distorted, flashing, or skewed image then you can go with the below solutions.
Technique #3: Remove Connected Devices
Another method by which you can try to troubleshoot this issue is to remove all the connected external storage devices from the system.
Sometimes external storage media that is connected to the PC can build up an electromagnetic field which results in scrambled, overlapping, or distorted images on your screen.
Technique #4: By Pushing A Degauss Option
A Degaussing is a process to eliminate the waves of a magnetic field. Occasionally, these kinds of magnetic waves might be the main cause that can lead to faulty displays.
Thus, if you have a CRT (Cathode Ray Tube) PC, try to solve the display issue by degaussing. In order to fix with Degauss option, follow these steps:
Step 1: CRT PC has the degauss option. You need to hit it to remove a magnetic wave of the computer.
Step 2: Turn off & turn on the computer. That’ll be capable of degaussing a few computers automatically.
Step 3: Some computers have the option to launch a screen menu. choose it to the degauss.
Well, this solution is limited to the CRT & not LCD systems.
Technique #5: Reset The Monitor To A Default
Using the PC continuously, a screen setting might get changed. So, you need to reset your monitor to the default settings. By following the below instructions, you can do so:
- First of all, press on menu/settings option in your desktop. This opens up a main menu.
- Next, select the option Restore Factory Settings.
- A menu setting varies with the brand & model. For example, Dell monitors generally have the ‘Factory Reset’ whereas Samsung monitors display ‘Reset all’
Technique #6: Adjust The Monitor’s Screen Resolution
If you’re encountering the widescreen monitor, pixelated, blurry, or stretched display on a laptop then adjust a screen resolution.
Follow the easy steps To solve Distorted photos In the Toshiba Laptop
- At first, open your PC desktop.
- In the second step, you need to right-click >> click on the Display In the search bar, you can type the ‘Display Settings’.
- Then, scroll down the Scale & layout >> then set-it to the ‘Recommended’.
- Next, go to the Display resolution. Then, again set it to the ‘Recommended’.
- Next, close a settings option. Check if a distorted or blurry display issue is fixed.
Also, you could simply visit a manufacturer’s website & check your PC’s manual for the correct resolution of a CRT, laptop, or LCD.
Technique #7: Update PC Drivers
In order to update the computer driver, you need to follow the beneath steps. Following these instructions can help you to fix skewed images on the screen.
Follow These Steps In order to Update Drivers
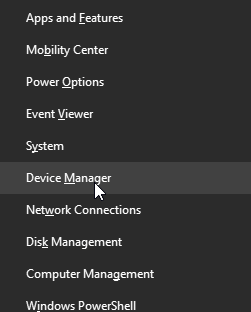
Step 1: In a search box you have to type a device manager.
Step 2: Choose Device Manager.

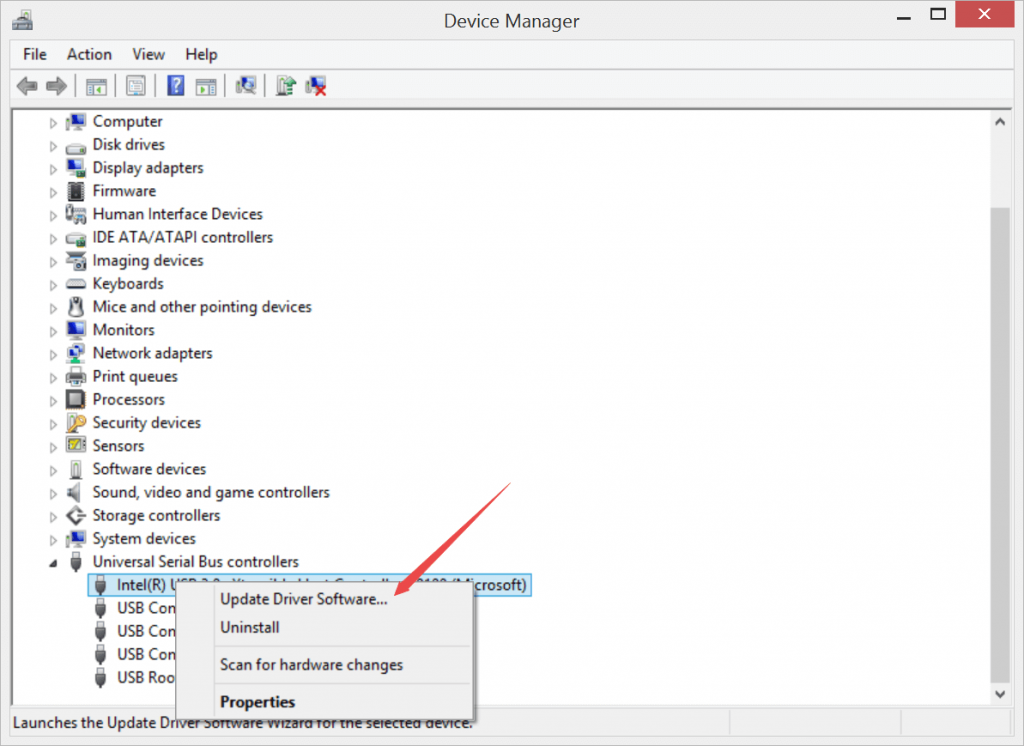
Step 3: In-Display adapter, you need to right-click a graphic card >> click on the Update driver.

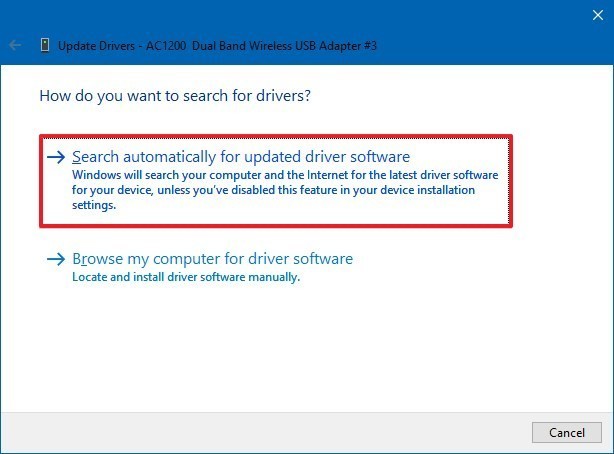
Step 4: Then choose the Search automatically for updated driver software option >> tap on Update Driver.
Technique #8: Replace The Video Card
Well, a faulty graphics card might also lead to flashing images on your desktop. Just replace the video card & then check if it fixes the distorted display issue.
Note: If your system is old, replace the complete motherboard. As the old PSs used AGP technology that may not be found currently. Recent graphics cards run on a PCIe interface.
Technique #9: Reinstall The Drivers
Though, if updating graphic cards or replacing the video card doesn’t help then try to reinstall them. Though, reinstalling the drivers resolves almost each and every issue like overlapping, distorted image, or damaged display of the screen easily.
Here Are The Easy Steps in order to Uninstall Drivers:
Step 1: First, right-click the My Computer/ This PC.
Step 2: In the second step, you need to tap on Manage and then Device Manager.
Step 3: Double-click on the Display Adapters which you can see in an appearing list.

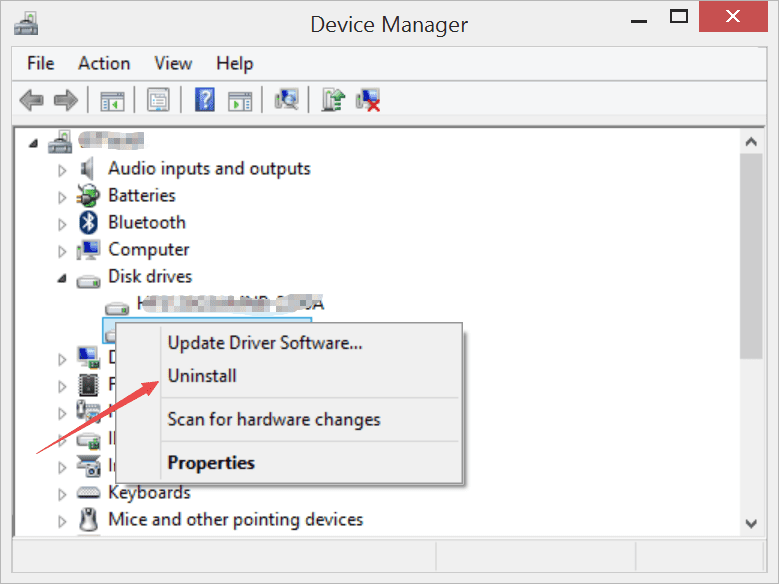
Step 4: Make right-click a graphic driver >> tap on Uninstall.

Step 5: Tap on OK option.
After completion of these steps, reboot your PC. Windows will reinstall drivers automatically.
Technique #10: By Replacing The Monitor
In case none of the above 9 manuals helped you to fix a distorted flashing or skewed image issue then change your monitor.
However, all the aforementioned solutions have a few flaws as well. Although this process might take a lot of time to perform every process and low-speed execution & even needs some technical knowledge.
But if you need a safer & stress-free method then you should select the professional Photo Recovery tool mentioned in the below section. You can even use this program without any technical skills.
Automatic Solutions To Fix A Distorted, Flashing Or Skewed Image
If the above manual solutions are unable to solve pixelated, skewed, color lines image, it must be the file corruption problem.
Photos turn grainy, blurry, pixelated, greyed-out, or distorted on your screen when they get corrupt. In such a situation, you need a powerful third-party photo repair software like Photo Repair Tool.
This program has the best features with the help of which it becomes so easy to fix corrupt JPEG header or other issues related to all image file formats.
With the help of this feature-loaded tool, one can:
- Repairs all raw file formats
- Preview the repaired files and save them in your preferred folder
- Completely trusted and available at an affordable price
- 100% safe and secure to use, easy-to-use interface
This tool can be applied to both the operating systems; Windows as well as Mac.


* Free version of this program only previews repaired photos.
Let’s follow the step-by-step guide of this software to fix discoloration on a computer screen.
How to Fix Distorted Image Online?
If you want to fix distorted image online for free, then you have to follow the below steps carefully:
- Firstly, open your web browser on your PC.
- Then, visit https://pinetools.com/sharpen-image.
- After this, upload a distorted or skewed image and click on “Sharpen”.
- Finally, download the repaired photo on your desktop.
Frequently Asked Questions:
What Is a Distorted Image?
When the straight lines of a photo seem to be deformed or curved unnaturally, it is known as Image distortion.
What Causes Display Screen Image Distortion?
Distorted images can be caused by numerous factors, such as loose connections, faulty cables, damaged hardware or incompatible settings.
How Do I Distort a Skew Image in Photoshop?
To distort a skewed image in Adobe Photoshop, open the photo, then go to the Layer, Selection, or Shape >> Skew or Image > Transform > Distort.
Is There an App to Distort Pictures?
Photo Warp is an excellent app to distort pictures.
Time to Verdict
Above, I have discussed different methods to fix a distorted flashing or skewed image on your PC or Laptop. All the provided solutions are very effective and anyone can easily try those ways to maintain high-quality visuals across all your digital platforms.
Apart from that, I’ve also suggested you try professional Photo Repair Software for an easy fix.
Good luck!


Taposhi is an expert technical writer with 5+ years of experience. Her in-depth knowledge about data recovery and fascination to explore new DIY tools & technologies have helped many. She has a great interest in photography and loves to share photography tips and tricks with others.
