Have you captured a grainy or blurry pictures from your camera that contains dots, spots or visible pixels? It may be due to bad lighting condition or small camera sensor. Regarding the reasons, this issue can be easily fixed by applying the fixes mentioned in this post. Here, we have specified 5 best solutions on how to fix grainy photos along with its possible causes.
So, without any further delay let’s move ahead quickly….!
To solve grainy or blurry pictures, we recommend this tool:
This software will repair grainy, distorted, pixelated, blurry, greyed-out images and restores your prized memories effeciently. Now repair your corrupt or damaged photos in 3 easy steps:
- Try this Photo Repair Tool rated Great on Pcmag.com.
- Click Add File to add the photo you want to repair.
- Select Repair to start the repair process and save the repaired image on the desired location after the repair is done.
Part 1: What Does Grainy Picture Mean?
Part 2: What Makes Your Captured Image Grainy?
Part 3: How to Fix Grainy Pictures Issue?
Part 4: How To Fix Grainy Photos On Android Phone?
Part 5: How To Avoid Grainy Photos?
Part 1: What Does Grainy Picture Mean?
The picture is said to be grainy if it’s having so many small dots (black, white or colorful) specs or visible pixels scattered all over it. These tiny particles are often known as “grains”.
These grains affects the overall sharpness of the image and makes your pictures less clear (blur) and smooth. Grainy pictures are often resulted due to number of reasons. To know them, you need to move down to the next section of this post.

Part 2: What Makes Your Captured Image Grainy?
These are the most common factors that often makes your pictures grainy. Have a look upon them:
Bad Lighting condition
The main reason which makes the picture grainy is photography lighting.
For an example: if you’ve captured a picture at the sunset or low lightroom, you will unable to manage the accurate low aperture & higher ratio of iso. Though, if you’ve turned your flashlight on, these situations can make your photo grainy.
Small Sensor of Camera
A poor/bad sensor of the digital camera is another common factor that can make noisy images.
ISO Setting
As you increase an ISO of the camera, it increases the grains or noise in the photograph. It is necessary to increase ISO in less light or while shooting pictures at night.
Poor Camera Quality
If you’re using the cheap quality camera then it may mutate the image quality that you’re clicking, because of which your pictures might turn grainy.
Part 3: How To Fix Grainy Pictures Issue?
Check out the below step-by-step guide to troubleshoot grainy effects in a photo.
Fix #1: How To Fix Grainy Photos In Photoshop
Photoshop is one of the best app to fix grainy photos. This photo editing tool has an in-build filter that helps to reduce noise and grain of the pictures to some extent. In order to know how to fix grainy photos in Photoshop, try the beneath steps:
Step 1: Open the grainy image in your Adobe Photoshop
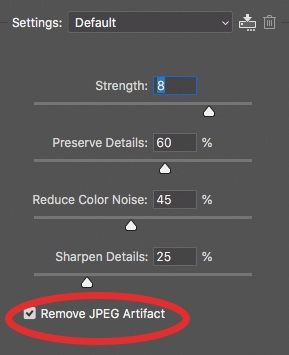
Step 2: On the top bar, you need to tap on the Filter >> Noise and then click on Reduce Noise
Step 3: Under the Window Reduce Noise, adjust 3 sliders – Strength, Sharpen Details and Reduce the color noise till you reduce grains & obtain the required quality.
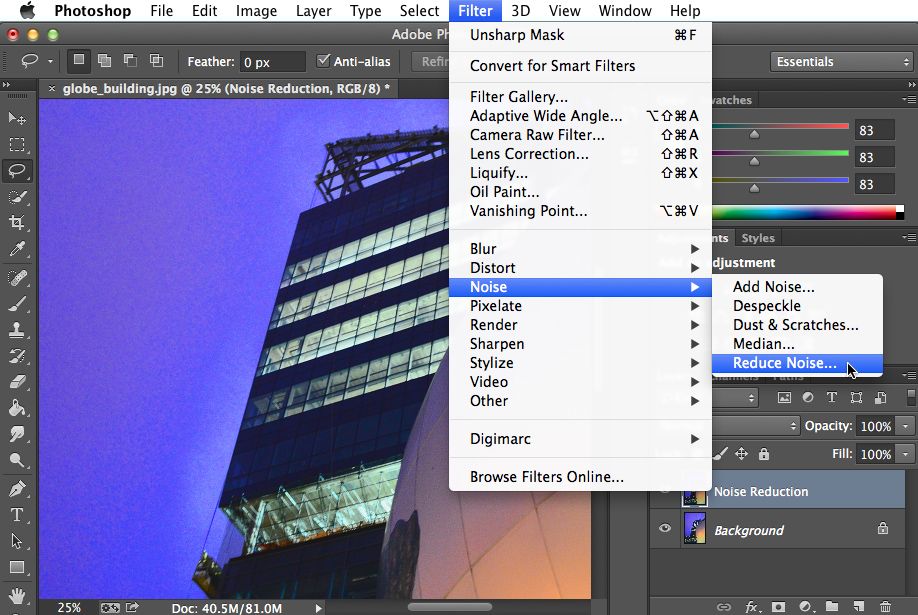
Step 4: Now, you will be able to see an outcome in a Preview box which you can see on a right side simply by checking a box- Remove the JPEG Artifact.
Step 6: Tap on OK & save an edited image.
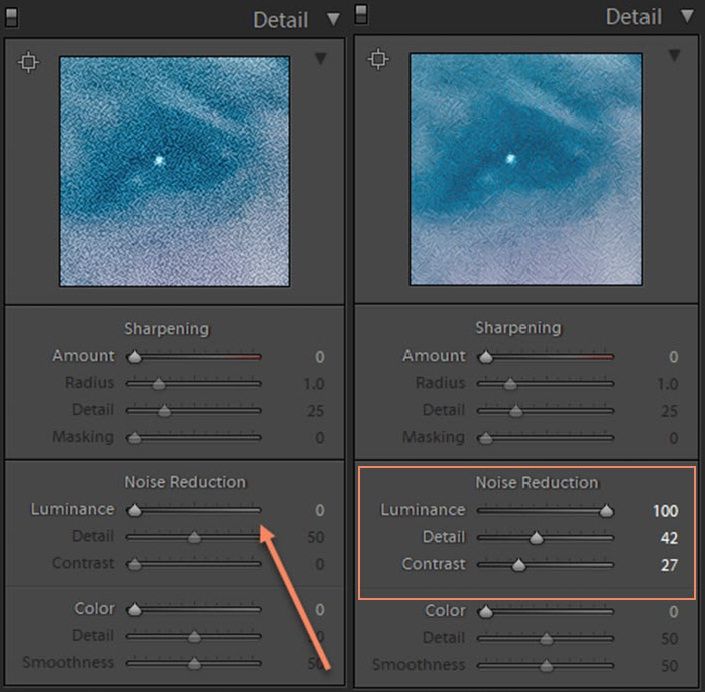
Fix #2: How To Fix Grainy Photos In Lightroom
Adobe Lightroom is another software that can help you to fix grainy photos. To know how to fix grainy photos lightroom, you need to try out these simple steps:
- Open Adobe Lightroom app on your PC.
- Then, open the picture in the app.
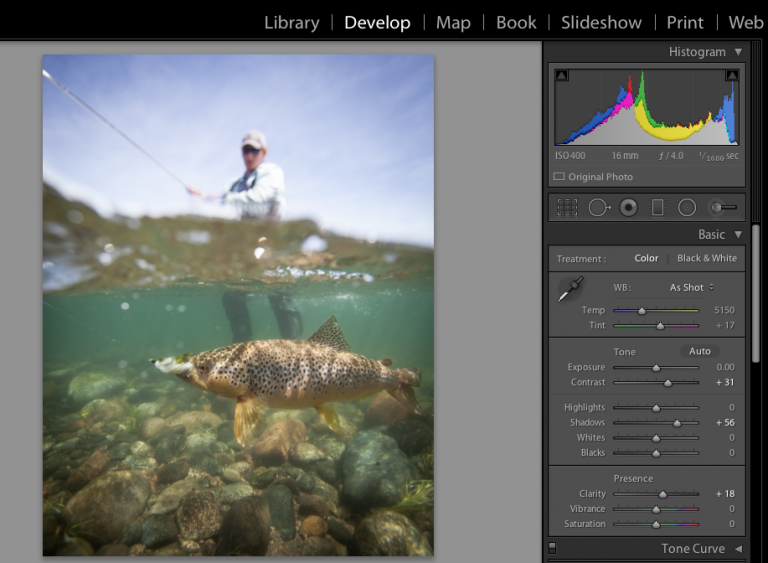
- Choose the ‘Detail’ option in a right panel.
- In a ‘Noise Reduction’ tab, you’ll see 2 options- Luminarc & Color.
- Next, adjust the noise reduction in a Luminarc using the ‘Detail’. Adjust the ‘Contrast’ in the color. Try this step till you fix the grainy effect on a picture.
- Likewise, on a right-side panel, you can adjust a ‘Slider’
- check a view on right panel.
After following these steps, check if got a desirable picture with a less grainy effect then save that edited picture.
Fix #3: Reduce Grain Using Plugins
After trying the above two ways if you’re still encountering grainy, fuzzy, or blurry images then use plugins to solve it.
Using plugins will surely help you to reduce noise & resolve grainy pictures. The best thing about plugins is- you can correct only the selected part of the grainy picture & not a whole photo.
Some of the frequently used plugins are Noise Ninja, Noise Reducer Pro, Neat Image, Photo Ninja, NoiseWare, Topaz DeNoise, etc. All these plugins have the ability to repair severely corrupted pictures.
Fix #4: Use PhotoWorks
The PhotoWorks is popular photo editing software for its easy-to-use interface and simplicity among its users. So, if you’re also going through grainy image issue, follow the below instructions carefully to reduce grain or blur from an image using PhotoWorks:
Step 1: Launch & run the PhotoWorks software on your PC >> add a photograph you want to edit.
Step 2: Tap on Tools tab of PhotoWorks app >> choose Noise Reduction option.
Step 3: Zoom your picture & start sliding a slider that will help you to smoothen your photo. Do it till it reduce the grain from the image.
Step 4: At this time, compare an original picture with an edited image for better clarity & complete the process.
Fix #5: Use Professional Recommended Tool To Fix Grainy Photos Free
There are many solutions on how to fix grainy photos issue, but Photo Repair Software is the best among all of them .
This program has the best features with the help of which it becomes so easy to solve grainy effect in a photo. It is compatible with both the OS; Windows & Mac respectively.


* Free version of this program only previews repaired photos.
To know more outstanding features of this tool, click here.
Without any delay, just download this software & follow the step-by-step guide to know how to fix a blurry picture.
Part 4: How To Fix Grainy Photos On Android Phone?
Well, there are countless apps that are available on your Play store or Google app. You can download any best app to fix grainy photos on your Android device. One such tool is Fix Photo Blur, it is one of the powerful photo editing tools which can help you to fix your grainy or fuzzy images. It has the option “Fix Blur” that will allow you to adjust the blur intensity.
Some of the other applications are- GIMP, AfterFocus, Adobe Photoshop Express, etc. that you can use to solve this problem.
Part 5: How To Avoid Grainy Photos?
As we all know that precaution is better than cure, so you can avoid grainy pictures further by following the below tips.
- Keep your camera ISO setting below 1600 when possible.
- Try to shoot an image in a RAW format.
- Choose exposures for a variation of shots.
- Expand your camera’s aperture for more lighting.
- Shoot using the tripod to shoot pictures.
FAQ (Frequently Asked Questions)
Can You Fix A Grainy Pictures?
Of course yes! You can not only fix your grainy pictures by using any of these photo editing tools - Photoshop, Adobe Lightroom, Photoworks etc.
How Can I Make A Grainy Picture Clear?
You can simply make your grainy or blurry image clear by overexposing the image slightly. Doing this will help you to minimize the grain from your photo during post-processing stage. And when you will increase the exposure, it’ll reduce a digital noise also.
How Can I Clean Up Grainy Photos For Free?
Here is the list of 8 best apps that can help you to make your images clear for free:
- Snapseed
- PIXLR.
- Photo Editor & Collage Maker by BeFunky.
- Photo Director.
- Enhance Photo Quality (Android and iOS)
- Lightroom Moblie App.
- Lumii (Android)
- FOTOR.
How Do I Sharpen A Grainy Image In Photoshop?
If you want to sharpen your grainy pictures using Photoshop, follow the below given steps:
- Open your grainy image in Adobe Photoshop.
- After that, go to Filter menu & select Sharpen.
- Here, you can see a slider using which you can adjust the amount of the sharpening according to your wish.
Is It Hard To Repair Grainy Photos Without A Photoshop?
No, it is not tough to repair grainy pictures without Adobe photoshop. There are several image editors (Photoshop alternatives) are available using which you can remove the grain from the images easily.
Conclusion
A grainy or blurry pictures can really ruins our visual experience. Thus, it’s very important to fix grainy photos issues using the correct method. Here, in this post I have provided the 5 workable solutions on how to fix grainy photos.
So, if you are dealing with grainy, blurry or fuzzy images then you must try out the techniques mentioned above. All the solutions are very effective but using the Photo Repair Software is best all among them
If you find this post helpful to you then forget to share it with others who really need to resolve how to fix blurry photos Photoshop or with other programs.


Taposhi is an expert technical writer with 5+ years of experience. Her in-depth knowledge about data recovery and fascination to explore new DIY tools & technologies have helped many. She has a great interest in photography and loves to share photography tips and tricks with others.