Want to learn the solutions on how to transfer photos from camera to computer? If yes, then do not worry! as you have reached at the correct place. This article provides you the best workarounds to transfer photos from camera to laptop/PC.
So, without any further delay let’s move ahead…….!
How Do I Transfer Photos from Camera to Computer?
How To Transfer Photos From Camera To Computer With USB?
How To Transfer Photos From Camera To Computer Without USB?
How to Transfer Photos from camera to computer wirelessly?
How Do I Transfer Photos from Camera to Computer?
Transferring photos from the camera to your computer or laptop is not a difficult task. The best and easy way to transfer photos from camera to computer without losing quality is by the card reader. Below you can see how:
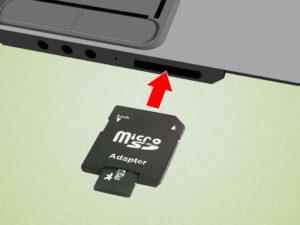
#1: Transfer Photos from Camera SD Card to PC via Card Reader
Transferring photos from camera to PC by camera’s memory card is quite easy. You just need to get a card reader to transfer photos.
- Insert the memory card into the card reader.
- Plug the card reader into the computer, it will display the folder where your pictures are saved.
- Now select all photos by pressing ‘Ctrl + A’ and then press ‘Ctrl + C’ to copy all the files.
- And finally, press ‘Ctrl + V’ to paste the copied pictures from the camera to your desired folder.
Moreover below are some other mentioned ways to transfer your shots from camera to computer.
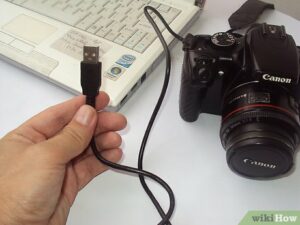
How To Transfer Photos From Camera To Computer With USB?
Transferring photos to your computer via USB is considered to be the easiest and the most reliable way. However, for this, you just need to connect the camera to your computer. Furthermore, follow the below steps to do so:
- Connect your camera with your computer via USB cable and switch off the camera.
- Now click “START” and go to “My Computer”. You can see a removable disk or icon named with your camera. Open the removable disk to view its content.
- In a camera, you can see DCIM (Digital Camera Images) folder in which all photos are stored.
- Now select all photos by pressing ‘Ctrl + A’ and then press ‘Ctrl + C’ to copy all the files.
- After copying all the files now, create a new folder on the desktop or you can select the desired location such as D: or E: drive on your computer in which you can paste the images from the camera.
- Now open the new folder and press ‘Ctrl + V’ to paste the copied pictures from the camera.
- On completion of copying files, you can disconnect your camera or memory card from your computer.
Check the transferred photos on your computer to make sure that the entire photo has been transferred successfully or not.
How To Transfer Photos From Camera To Computer Without USB?
#1: Use Photo App To Transfer Photos
You can also make use of a photo app like Picasa to transfer photos from your camera to laptop with the least effort. This app is famous for editing as well as importing and managing your photos.
- Download Picasa and then connect your camera card to the computer
- Open Picasa and click on the Import tab to open it.

- A box will appear displaying Import from & Import to options.
- Select the photos from the camera in the Import from a tab.
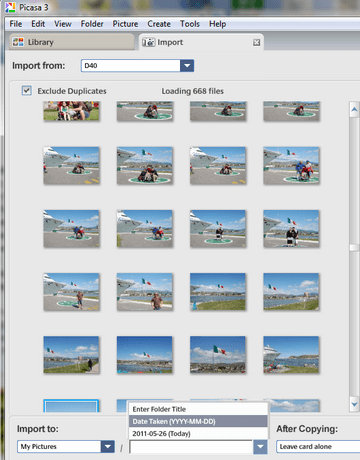
- Create a new folder in the desired location and select the new folder in the Import to tab.
- Click on OK to start the transfer of photos.
After transferring disconnect your camera and see whether the photos are transferred or not.
Note: In case you deleted your photos from Picasa and need to recover them, then you can visit this blog- How to Recover Deleted Photos from Picasa on Windows/Mac
How to Transfer Photos from camera to computer wirelessly?
Moreover, if you have Wi-Fi and Bluetooth features on both your camera and the system then you can easily transfer your camera snaps to a laptop by following the below two method guides.
#1: Transfer Photos From Camera to Computer via Wi-Fi
Today most cameras come with built-in Wi-Fi support that makes shifting photos from camera to computer easily without any extra effort. Hereby you just need to search for your camera model in Google to get a guide on how to use Wi-Fi or you can go for the user guide manual that comes with your camera.
Well here are the steps to transfer photos from Canon Camera to a Computer using Wi-Fi:
- Connect your system or laptop to the Wi-Fi source so that you can get connected to the internet.
- Now on your system install the Canon driver application with the help of your Canon camera’s wireless manual.
- Next turn on the Canon camera> then Wireless Canon camera transmission.
- After that wait until your system recognizes the Wi-Fi signals from your Canon camera
- Once connected open the photo folder that appeared on your screen.
- Lastly, transfer your all photographs to the desired folder on your system.
#2: Transferring camera photos to your system via Bluetooth
To transfer photos from camera to PC, you need to first turn Bluetooth on in both your system and camera and then you can transfer photos. Below are the steps to do so:
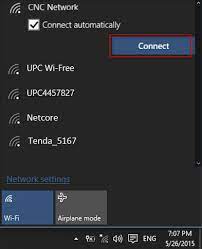
- Go to Start>Settings.
- Then select Devices under the Settings panel.
- Now select Bluetooth & other devices option.
- And turn the Bluetooth Toggle button on.
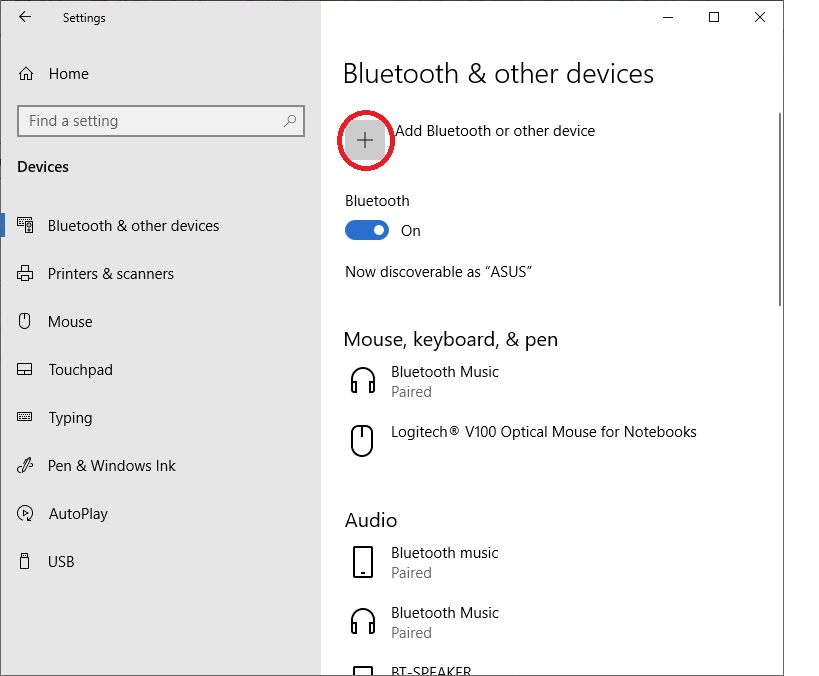
- Once done, go to the setup icon on your camera and turn Camera Bluetooth on.
- Now select the device to pair and select the photos to transfer and click on Send.
FAQs [Frequently Asked Questions]
How To Get Pictures From Camera To Computer?
You can easily get off your valuable pictures from camera using the card reader, USB cable or Photo App. Besides that, you can also transfer your photos from computer to PC using Wi-Fi or Bluetooth.
How To Transfer Photos From Canon Camera To PC?
In order to transfer photos from Canon camera to computer, you need to follow the below steps:
- Connect your Canon camera and computer via USB cable.
- Open the File Explorer on your PC and find your connected Canon camera there.
- Now, navigate to the folder on the camera where the pictures are saved.
- Select the pictures that you want to transfer, copy them and paste them to your any location of your PC.
- Once done, select the 'Eject' option on your system to disconnect the camera from PC.
What To Do If My Computer Doesn't Recognize The Camera?
If your computer doesn’t recognize the camera, you can try the below methods to make it recognizable:
- Check the connections between devices.
- Make sure the camera is powered on.
- Try different USB cables and ports.
- Try updating the camera’s drivers.
- Connect your camera on another PC.
Conclusion
Transferring photos from a camera to a computer is not a difficult task. By following the methods mentioned in the above section of this post, you can easily transfer photos from camera to computer without losing quality.
Now, it depends on you whether you want to transfer your photos using a card reader, USB, or wirelessly (Wi-Fi or Bluetooth). All the methods are very easy to apply and effective as well, so you must try all of them until you transfer the photos to a PC successfully.
All the very best to you……!
Reference – https://support.microsoft.com/en-us/windows/import-photos-and-videos-aed09800-f826-4d40-a243-7640de229d9d
[cta-en-btn]
Taposhi is an expert technical writer with 5+ years of experience. Her in-depth knowledge about data recovery and fascination to explore new DIY tools & technologies have helped many. She has a great interest in photography and loves to share photography tips and tricks with others.