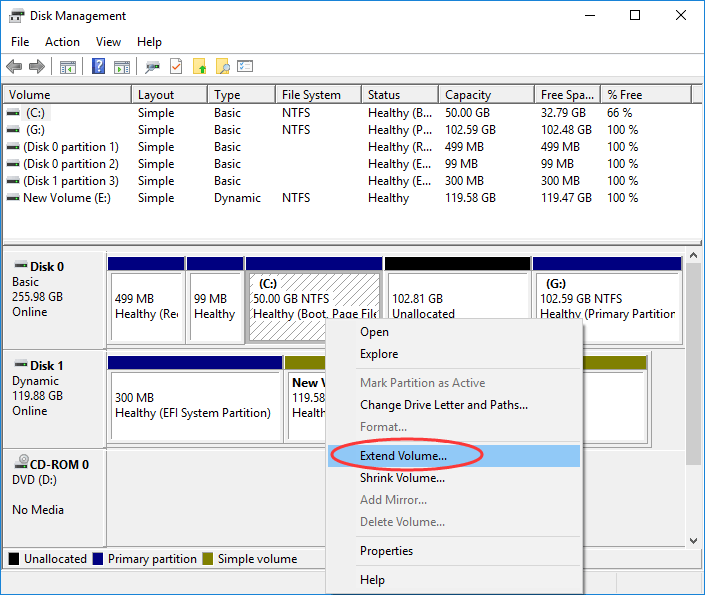
Disk Management is a Windows built-in tool that can be utilized to maintain the partitions on the hard disk. It offers features to create, extend, or even delete the volumes. But sometimes users fail to extend their volume just because extend volume greyed out in Disk Management. Thus, if you are also facing the same issue, don’t worry anymore! In this post, we’ll dive deep into the causes of the extend volume greyed out Windows 11/10 problem and how you can fix it.
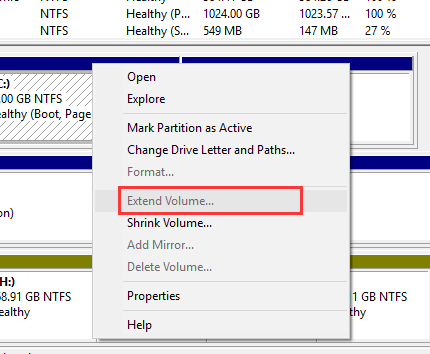
So, without much delay, let’s get started…
Free Hard Drive Data Recovery Tool.
Recover data from USB drives, Pen drives, SSDs, HDDs, and other devices on Windows. Try now!
Quick Navigation:
Why Is Windows 11 Extend Volume Greyed Out?
How to Fix ‘New Simple Volume Greyed Out Windows 11/10/8’ PC?
- Delete the Partition In Between
- Create Unallocated Space
- Extend Volume In The Disk Management
- Format Partition
- Covert MBR Disk To GPT
Ultimate Solution: Use Partition Recovery Tool To Recover Partition Data
Why Is Extend Volume Greyed Out?
There could be several reasons behind the issue you get ‘volume greyed out windows 7/8/10’. But, here, some of the major reasons are mentioned below that will let you know why is the extend volume option greyed out:
Reasons for Basic Disks:
- No continuous unallocated space is there behind the primary partition that you want to extend. Also, there’s no continuous space behind the logical drive that you want to expand. If you want to know more about this, you can click here.
- The volume or partition you want to enlarge is NOT an NTFS partition. Microsoft says that the extend volume feature in Disk Management only works to a RAW or NTFS partition.
Reasons For Dynamic Disks:
- No unallocated space is there on dynamic disks.
- There’s not any continuous unallocated space behind the C drive.
- No continuous space is there located behind the spanned volume, mirrored volume, RAID volume or stripped volume. Also, no continuous unallocated space is there located behind only one segment of these types of volumes.
Now, let’s move on to learn how to fix C drive extend volume greyed out problem…
How to Fix ‘Extend Volume Greyed Out Windows 11/10/8’ PC?
Here are some of the working solutions that can help you troubleshoot this issue:
Fix 1: Delete the Partition In Between
If there is unallocated space on the hard drive but you are not able to extend the volume then it may be because there are other partitions between the volume you want to extend and the unallocated space. So, to fix this issue, you have to delete the partition in between, and to do so, you have to follow the below steps:
- In the very first step, you have to press Windows + X keys together.
- Then, select Command Prompt from the list to open the elevated command prompt.
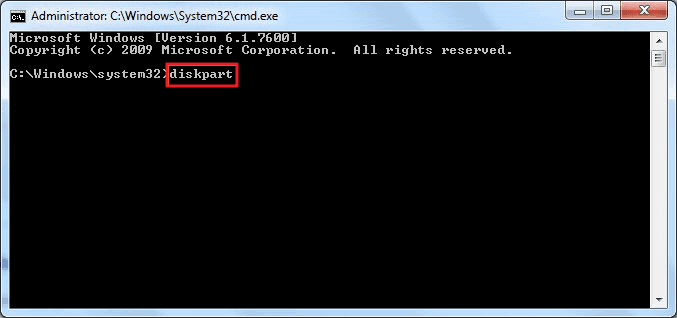
- Now, you have to type there Diskpart so that you can open the DiskPart utility.
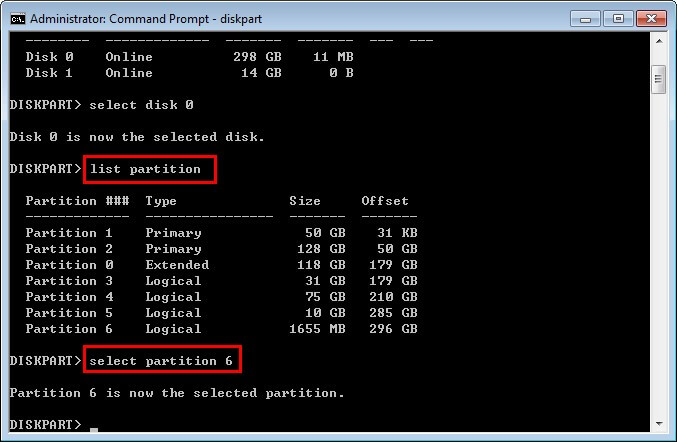
- After this, once the diskpart opens up, you have to type there ‘list disk’ and then simply type ‘select disk X’. This will help you select your disk. Here, X is the disk number.
- Next, you have to type there ‘list partition’ and then press Enter.
- After this, you have to select the partition in between and then you have to type there ‘select partition X’. Here, X denotes the partition number.
- Now, you have to delete the partition and then type there ‘delete partition override’.
- Lastly, you will see that you can extend the volume after you delete the partition in between successfully.
Also Read: Fix “The Volume Does Not Contain A Recognized File System
Fix 2: Create Unallocated Space To Fix Can’t Extend Volume Windows 11
If you are unable to extend the volume and get a Windows 11 extend volume is greyed out error, it is very important to make sure that you have some unallocated space. Yes, it is important to have unallocated space on the system drive if you want to extend the volume. If there is no unallocated space on the hard drive then the option may be greyed out.
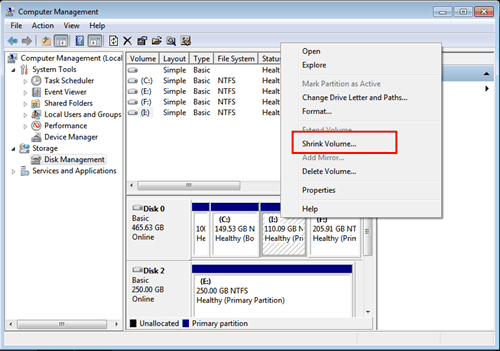
However, to fix this issue soon, you have to create some unallocated space. Well, to create some unallocated space on the drive you have to first remove a volume or a partition that is not at all being used. Or, also remove the empty partition and then you can extend the volume.
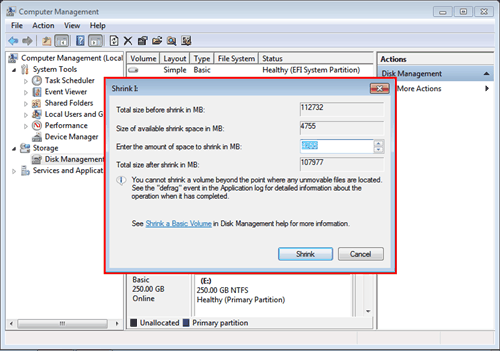
Also, you can get some unallocated space by simply shrinking a partition if you wish to avoid deleting the partition completely.
Apart from this, it is also very important to note that if the unallocated space and the volume you want to extend are not right next to each other then you will not be able to extend the volume at all.
Fix 3: Extend Volume Greyed Out With Unallocated Space In The Disk Management
Most probably new simple volume greyed out happens due to insufficient storage space on the disk. In such a situation, you have to first delete volume greyed out disk, or shrink the partition to leave unallocated or free space just next to a target volume.
Here is how you can easily do so:
- First, press the Win + X keys together, and tap on “Disk Management“.
- Make right tap on the empty partition which you can see next to a target volume.
- Then choose “Delete Volume” >> tap “OK“.
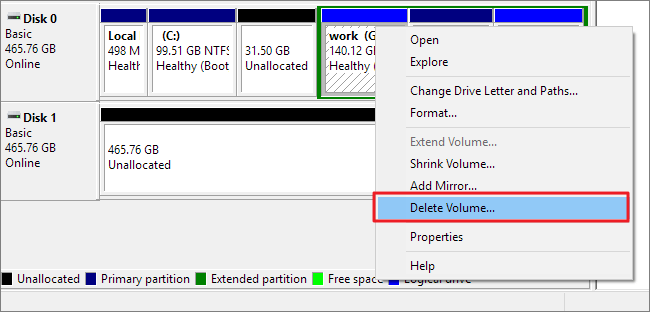
- You can also right-click a neighbor partition that has enough free space, select “Shrink volume“.
- Now, you need to state the disk space amount to shrink >> tap on “Shrink” >> “OK” option to confirm.
After that, you have to follow the below steps to increase the drive partition.
How to Increase The Partition Size:
- Go to Disk Management, make right-tap on a target partition that you need to extend.
- Choose “Extend Volume” & adjust size that you need to add to a target volume.
- Tap on “OK” option to confirm.
Fix 4: Fix Windows 10 Extend Volume Greyed Out On Format Partition
Another method that you can try to solve this issue is to ensure that the drive is in the correct format or not for increasing the size. The format has to be NTFS or RAW format. In case, if a drive category is FAT32, Windows cannot format it.
For this, you have to first know the drive type by following the below steps:
- Press the Win+R keys at the same time.
- Next, type the “diskmgmt.msc” >> click “OK“.

- Once Disk Management gets opened, you’ll get a list of the drives.
- Now, right-tap on a problematic drive & tap on the “Properties“.
- Here, you’ll notice a format in a ‘File system’.
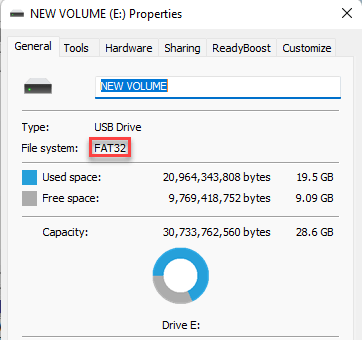
Now, let’s move on to fix this error by formatting a drive in the NTFS format using a Disk Management.
Here is how you can do so and fix new spanned volume greyed out–
- Open a Disk Management.
- Make a right-tap on a problematic drive & tap on the “Format…”
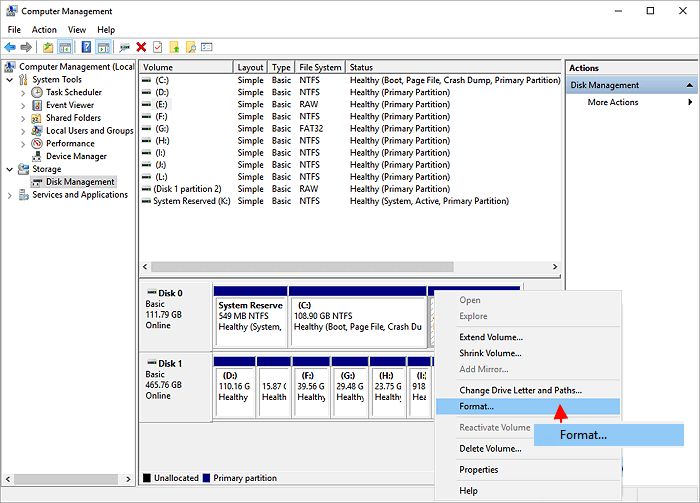
- Next, set a File system to the “NTFS” format.
- In the fourth step, check the box “Perform a quick format”.
- Tap on “OK” option to proceed.

Also Read: Fix “CHKDSK Cannot Open Volume For Direct Access” Error
Fix 5. Covert MBR Disk To GPT
If none of the above fixes had helped you to troubleshoot this problem you can easily convert MBR disk to the GPT to break a limit.
Most of the time, it happens that, if you made a single volume that reaches 2TB volume size then you cannot continue increasing the partition. At the time, the extend volume option is greyed out. And that’s why it is essential to convert the MBR disk to the GPT.
Ultimate Solution: Use Partition Recovery Tool To Recover Partition Data
In case, if you ever found that while removing or creating unallocated space on hard drive, if your data gets deleted or lost unintentionally then use Partition Data Recovery Tool. This tool will help you recover the data that have been deleted while creating or removing partition or volume. You can use this tool even you don’t have any technical knowledge.
With the help of this tool, you can:
- Recover deleted data from all storage devices
- Recovers deleted/lost/inaccessible photos, videos and audio files of all file formats
- Also restore RAW image files formats from all camera devices
- Compatible with Windows as well as Mac OS
- 100% safe to use, secure and easy to use interface
emid emid
emid
* Free version of the program only scans and previews recoverable items.
Here is the step-by-step guide that can help you recover deleted USB drive partition data. You can try all these three steps one by one to use this fully-featured partition data recovery tool.
Frequently Asked Questions:
How Can I Extend C Drive Space Without Formatting Windows 10?
When there’s unallocated space for C drive, then you can increase the space of your C drive by using Windows Disk Management. Follow the below steps to extend c drive space without formatting on Windows 10:
- Go to start menu >> type compmgmt.MSc in a search box >> hit Enter.
- Find the Storage option >> choose Disk Management.
- Now, make right-click on a partition that you need to extend >> select the ‘Extend Volume’ option to continue.
- Then, set & add more size in order to target the partition >> click ‘Next’ option to continue.
- Finally, tap on the ‘Finish’ button to finish the process.
Why Extend Volume Is Greyed Out Even With Unallocated Space?
The extend volume is greyed out even with unallocated space due to one of the following reasons:
- A target partition isn’t NTFS file system
- The free or unallocated space is far away from a volume that you need to expand.
- There’s no unallocated space next to the one that you need to expand
- The disk might be MBR, not the GPT.
How Do I Fix Extend Volume Greyed Out In Windows 11?
In order to fix extend volume greyed out Windows 11, try the below tricks:
- Create The Unallocated Volume Using Disk Management
- Convert MBR Disk To GPT
- Delete A Recovery Partition
Does Extend Volume Delete Data?
No, resizing the partition don't delete data saved within it. Thus, it only extending & shrinking the partitions.
Bottom Line
The extend volume greyed out even with unallocated space error can be frustrating, but with the proper knowledge and working solutions, it’s manageable. Well, I have tried my best to provide you with all the solutions through this blog that can assist you in getting rid of this error.
Also, you may lose data while you delete or create a partition or volume, in such a case, you can try the Partition Data Recovery Tool to recover deleted data successfully.

Taposhi is an expert technical writer with 5+ years of experience. Her in-depth knowledge about data recovery and fascination to explore new DIY tools & technologies have helped many. She has a great interest in photography and loves to share photography tips and tricks with others.

