VLC player pixelated video issue mainly occurs when you excess compress the video file to make it smaller & reduce the memory usage. Besides, corrupted video file or outdated version of VLC can also trigger this problem. To fix it, you can reopen the VLC player, update VLC, use an advanced Video Repair Tool, etc.
It can be annoying when you attempt to play your favorite videos/movies on VLC Player but it refuses to play or the video becomes blurry, pixelated, or gray. However, such issues can easily be solved by applying some quick ways.
Thus, if you are recently facing a video pixelation issue on VLC, simply check out this post and learn how to fix VLC pixelation problem successfully in 10 ways.
To fix corrupted, choppy, jerky, pixelated or grainy videos, we recommend this tool:
This software will repair flickery, stuttery, jerky, unplayable videos and supports all popular video formats. Now repair your corrupt and broken videos in 3 easy steps:
- Try this Video Repair Tool rated Great on Pcmag.com.
- Click Add File to add the video you want to repair.
- Select Repair to start the repair process and save the repaired video on the desired location after the repair is done.
How To Fix VLC Player Pixelated Video Problem?
Watch this Video tutorial to learn how to fix VLC player pixelated videos:
- Close & Open VLC Player Again
- Do Backward or Fast Forward the Playback
- Use an Advanced Video Repair Tool to Fix Pixelated Video
- Disable the “Hardware Decoding” Feature
- Enable “Video Output Settings”
- Change Value of a File Caching
- Send Video Files to Local Drive
- Update VLC Media Player
- Convert the Current Video File to Another Video Format
- Contact to VLC Official Support Team
1: Close & Open VLC Player Again
The very first method that I would like to suggest you is to reopen the VLC media player. Hence, it is one of the basic tricks that must be tried to fix each and every error or issue in the VLC player.
So, once you can do so and check if your movie is now playing smoothly or not. If not, try the below solutions to fix choppy or jerky videos.
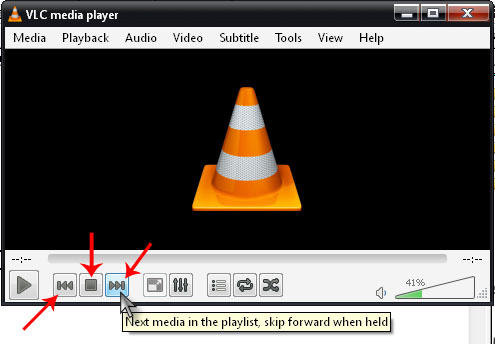
2: Do Backward or Fast Forward the Playback
Since you are experiencing VLC pixelation while playing your beloved video on a media player, it’s recommended to jump a few seconds forward or backward of a video to tackle the situation.
Though this method will not solve VLC pixelated gray screen problem permanently, it’ll clear VLC pixelation for a few moments.
In order to do so, you can use the dragging indicator point to go forward or backward in the video. Instead, you can press SHIFT + directional keys together to fast backward or fast forward a playback.
Also Read: 11 Fixes: VLC Not Playing YouTube Videos!
3: Use an Advanced Video Repair Tool to Fix Pixelated Video
It might possible that there is an issue with your video file itself not with the VLC Media Player. In such an instance, trying the proficient Video Repair tool can come handy. Though it has the ability to fix corrupted, jerky, pixelated, grainy, out-of-sync, truncated, blurry, no sound, black/gray screen, & other video-related issues.
Apart from that, it can also repair corruption in video frames, header, & slider movement.
Key Features of This Video Repair:
- Repair corrupted/damaged or inaccessible videos successfully
- Completely trustworthy
- Supports all video file formats like MP4, MKV, WMV, AVCHD, AVI, MOV, M4V, etc.
- User-friendly interface & easy to use
- 100% safe & secure.
The best thing about this program is that – it’s available on both the OS; Windows & Mac respectively. So, just download and install this Video Repair on your PC and repair grainy/pixelated video easily.


* Free version of this program only previews repaired videos.
Here is how you can use this tool:
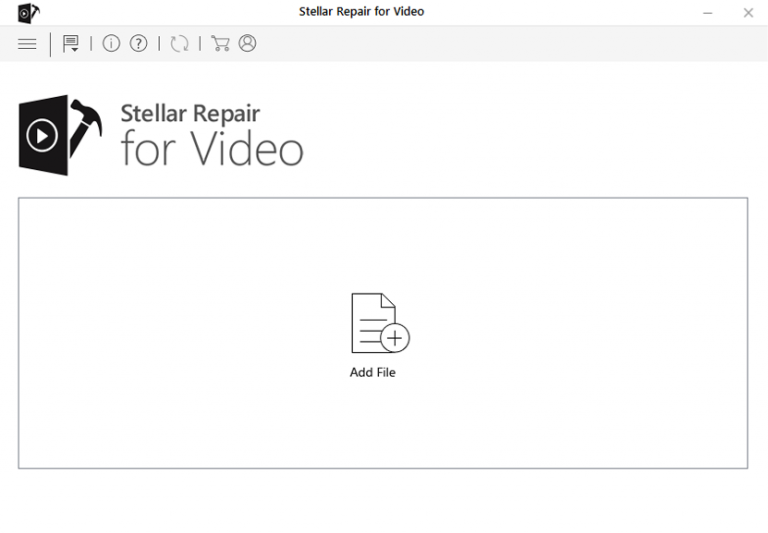
Step 1: Download, install and launch Video Repair software on your system. Click on 'Add Files' to add corrupted video files.
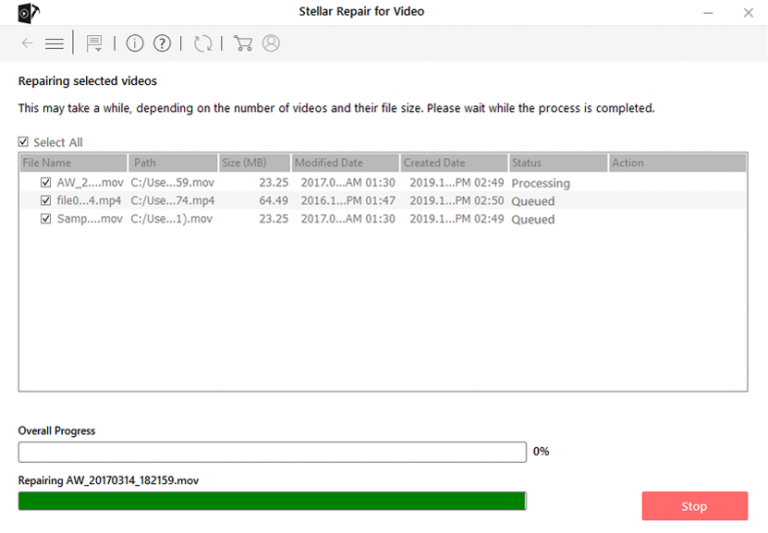
Step 2: Click on 'Repair' button to begin the repairing process. This start repairing your added video files one by one.
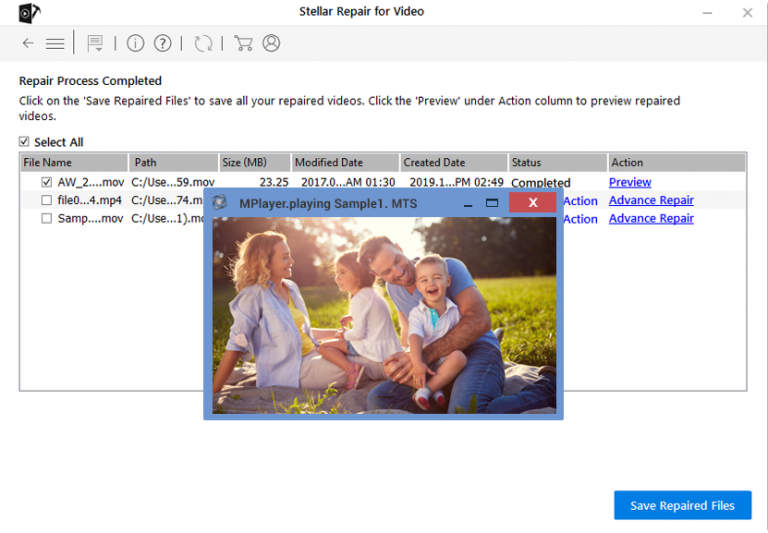
Step 3: You can click on 'Preview', in order to preview the repaired video file within the software and click on 'Save Repaired Files' button to save the repaired videos at desired location.
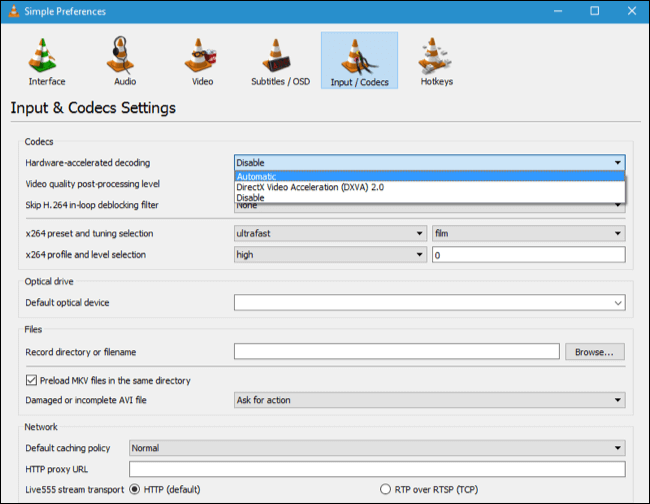
4: Disable the “Hardware Decoding” Feature
VLC Media Player has an advanced feature known as “Hardware Accelerated Decoding”. Enabling this feature helps to enhance the performance of your application and speed up your video playback.
But at times, this feature can conflict with your system drivers and trigger distorted, choppy, or blurry videos.
Though, it might possible that VLC player picture distorted or video-distorted issues had occurred due to enabling this feature. Therefore, simply disable it by navigating to the VLC setting and checking for the problem.
Here is how you can do so:
- Open VLC player >> then go to “Preferences” window.
- Click on the Input/Codecs
- Now, under Codecs section, select “Disable” option from the list against the Hardware accelerated decoding
- Finally, click on Save button to save all the changes in the settings that you’ve made.
Also Read: 10 Ways To Fix “MKV File Not Playing In VLC” [2022]
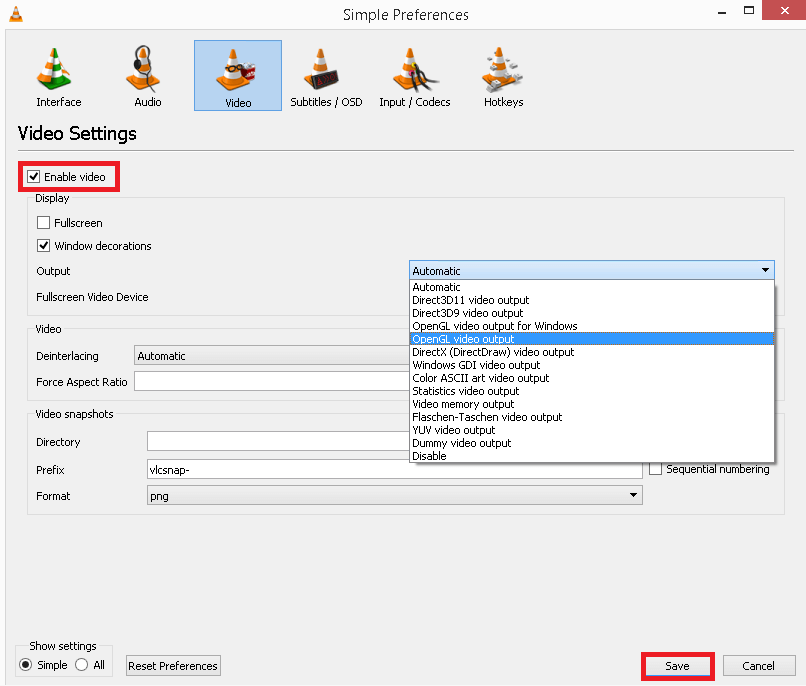
5: Enable “Video Output Settings”
Enabling the “Video Output Settings” in VLC Media Player is another yet option that can assist you to fix VLC video pixelation. By following the below steps, you can eventually enable/turn on the video settings option in VLC:
- Open VLC Player then click on Tools option that you can find at the top menu bar, then select Preference.
- Next, click on Video tab after navigating to the Simple Preferences page.
- Now, you need to check for “Enable Video”
- There, you can change the Video Output mode easily to an appropriate one (OpenGL video output) and check if it helps.
- Lastly, tap on the Save.
6: Change Value of a File Caching to Fix VLC Player Pixelated Video
Generally, the VLC media player needs to preload some parts of the footage or movie even if it’s an offline video file that is saved on your local drive. Therefore, increasing the file caching value in VLC can assist you to fix VLC pixelation at a certain point.
Follow the below instructions carefully to do this:
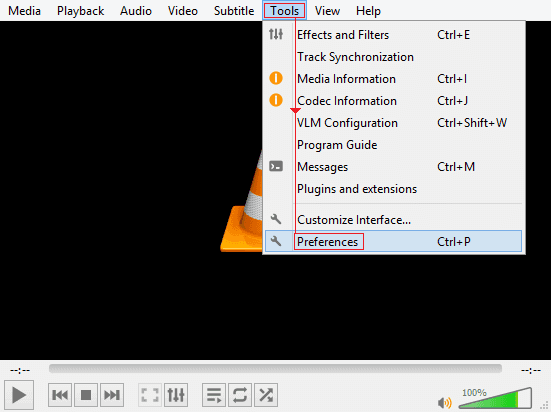
Step 1: Open VLC Media Player >> click on Tools option that you can find at the top menu bar, then select Preference.
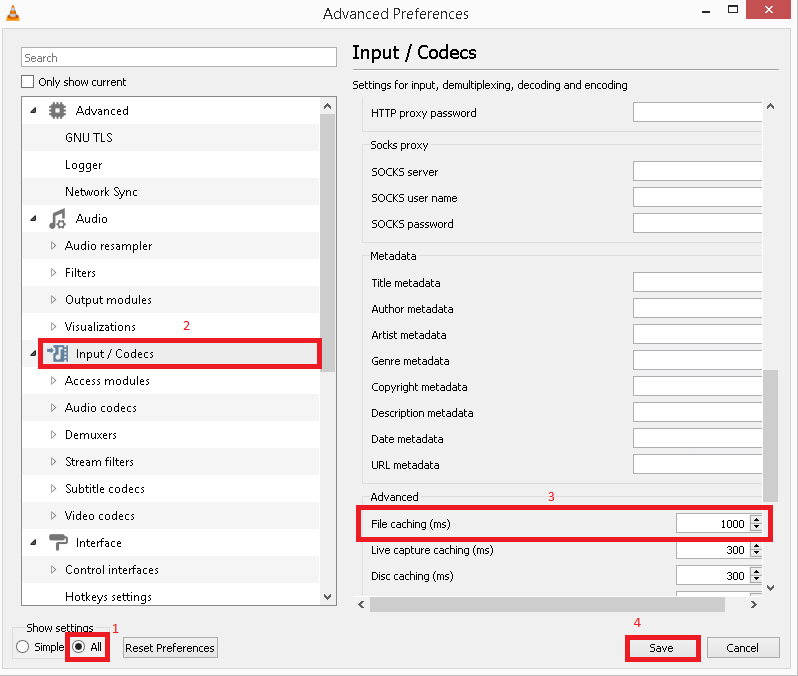
Step 2: In the lower-left corner, simply choose “All” option & enter “Advanced Preferences”.
Step 3: After that, click on “Input/Codec” option that you can see on a left side.
Step 4: Finally, scroll down to the bottom and find “Advanced” section, here you can increase the values for File caching (ms) to a higher-value (for example- 1500 or 2000 in the milliseconds).
Step 5. Click on “Save” & relaunch the VLC and try to play the video again.
7: Send Video Files to Local Drive
Moving video files to a local drive is another trick that can help you to get rid of this problem when trying to play the video from an external hard drive.
Many users have conveyed that they have fixed the video pixelation problem in VLC by transferring the video file to a local drive. So, you should also try this hack and check for the issue.
8: Update VLC Media Player
Running an outdated version of the VLC player is another foremost reason for triggering VLC pixelated gray screen.
So, once check if your VLC program is outdated or not. If it’s outdated, try to update it to its latest version.
Here is how you can update the VLC Media Player:
- Launch VLC Media Player then go to the “Help” that you can see at the top menu bar of your screen.
- Then select the option “Check for Updates”.
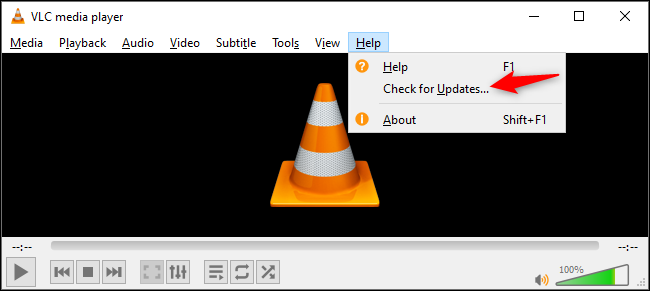
- Now, if there is any latest version available, you will be prompted there. Just tap on Update option.
9: Convert the Current Video File to Another Video Format
Most of the time, it has been seen that the video you are trying to play is unsupported by the VLC Player. In such an instance, converting the video file format to another video format helps many.
So, here you can do the same thing to troubleshoot Pixelated video playback in VLC. There is a huge change that if converted the video file to other file formats like MP4, MOV, AVI, etc. it will make the video playable smoothly.
For converting the video format, you can use any secure & free online video converting tool.
10: Contact to VLC Official Support Team
Even after trying the above DIY solutions, if the VLC player pixelated video issue still persists, you must contact to the VLC official support.
All you need to do is to visit VLC’s official support site & get professional assistance. They will surely help you to deal with the problem effectively.
Frequently Asked Questions:
Why Do My Videos Come Out Pixelated In VLC?
Video pixelation issue might occur on your VLC player if you have too much compressed your video file to make it smaller & reduce the memory usage. Apart from that, incorrect video output settings in VLC could also be triggered this issue.
How Do I Stop VLC From Pixelating?
If you want to stop VLC from pixelation then you must try some quick tricks like converting your video file to another format, send video file to a local drive, increase a value of file caching and disable hardware-accelerated decoding feature in VLC.
How Do I Fix Scrambled Video Playback In VLC?
To fix scrambled video playback in VLC Media Player, you have to follow the below steps:
- Launch VLC player >> go to the Tools then Preferences.
- Choose a ‘Video’ tab in order to go to the video settings.
- In ‘Display’ group, disable the option ‘Accelerated video output (Overlay)’ then click on Save option.
- Now, try to play the video and check if the scrambled video playback is solved.
Bottom Line
At the end of this article, I must say that you have got enough info regarding how to fix VLC player pixelated video problem. Here, I’ve covered 10 methods that will definitely help you to solve the VLC pixelated gray screen.
However, you can try any of the aforesaid solutions to troubleshoot this issue. But the proficient Video Repair software is the best among them.
Last but not the least, if you have any queries related to this topic then feel free to contact us on Twitter or Facebook.

Taposhi is an expert technical writer with 5+ years of experience. Her in-depth knowledge about data recovery and fascination to explore new DIY tools & technologies have helped many. She has a great interest in photography and loves to share photography tips and tricks with others.