You may need to run the error-checking utility on Windows to scan and repair your USB drives or other external storage drives for errors and issues. However, at times you may find that the error checking USB drive scanning and repairing stuck at 0%, 10%, or even 100%. This situation can be frustrating and concerning, leaving you wondering what might be causing the hang-up and how to fix this issue.
If you are troubled with the same situation, then do not panic! Today in this guide, I’ll show how to fix error checking scanning and repairing stuck external hard drive using 5 workable methods.
So without any further delay, let’s get started……!
USB Drive Recovery Tool.
Recover data from USB drives, Pendrives, SSDs, HDDs, and other devices on Windows. Try now!
Windows has a built-in error-checking tool that helps to scan and repair your storage drive errors and issues. Whenever you suspect that your storage drive has some errors or issues or Windows popups an error message like ‘there is a problem with this drive’, when connected it to PC, you need to use this utility to identify and repair your disk errors.
How to run the error-checking utility?
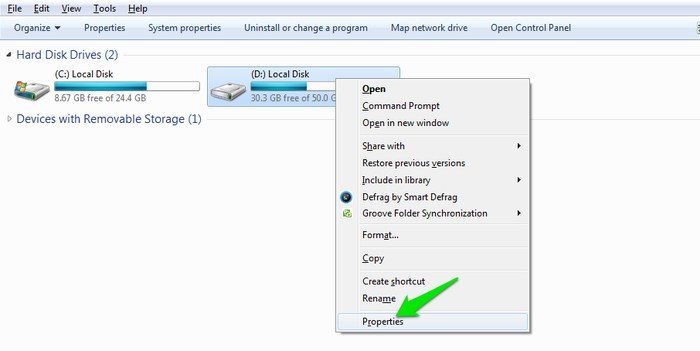
- Connect your storage drive to a computer.
- Then, go to “This PC” and find your connected USB.
- Right-click on it and choose “Properties”
- Now, click on the Tools tab > Check button under the error checking section.
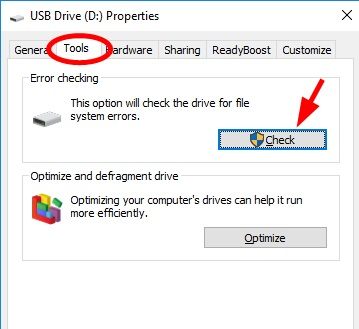
That’s it! Now the error-checking tool will start scanning your disk for errors and issues. Once the process is over; then you need to follow the onscreen instructions to fix the detected issue automatically.
Why Does The Error Checking Scanning And Repairing Stuck?
Generally, the error-checking USB drive stuck during the scanning and repairing process due to any of these reasons:
- The file system on the drive might be corrupted/damaged
- The presence of bad sectors on the external storage drive
- Interruption during the error checking process like – sudden removal of drive, power outage
- The USB drive might be infected by viruses/malware.
- Due to outdated disk drivers.
What To Do When Scanning And Repairing Drive Stuck At 0%, 10% or 100%?
If the scanning and repairing process gets stuck in the middle of the error-checking process, you can go through the below-mentioned fixes to address this issue easily.
#1: Wait for a While
Sometimes, the scanning and repairing process might take a longer time to complete, especially when the drive has a large capacity or there are numerous errors to fix.
So, before taking any action, it’s advised to keep patience and let the process complete. However, if you find the process remains stuck or haven’t made any progress for several hours then you can simply move to the next method.
#2: Cancel The Scanning And Repairing & Retry
The next method you can try to fix the scanning and repairing USB drive stuck is to cancel the scanning and repairing process and retry again.
Since the process gets stuck for a long time and can’t make any progress, it’s better to cancel the current scanning process and give it a fresh start.
Also, you can try disconnecting the USB drive from a computer, wait for a few minutes, and then reconnect it again to the PC.
#3: Execute Scanning And Repairing Process Using CHKDSK
If the Windows built-in error-checking tool is not working properly, then you can use the CHKDSK utility to perform the scanning and repairing process manually.
If the USB error checking stuck issue occurs due to the bad sectors on drive or file system corruption, the check disk scan will attempt to fix it.
Here’s what you need to do:
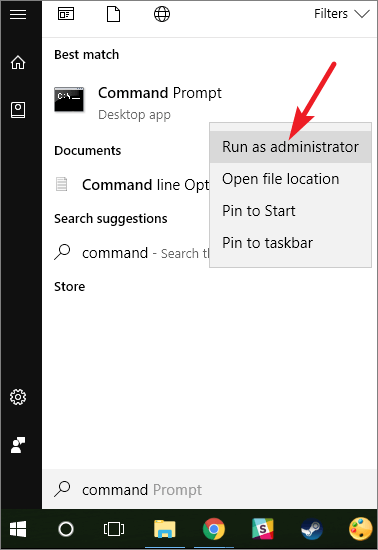
- Go to the Start menu and search for Command Prompt.
- From the appeared result, right-click on the command prompt and choose Run As Administrator.
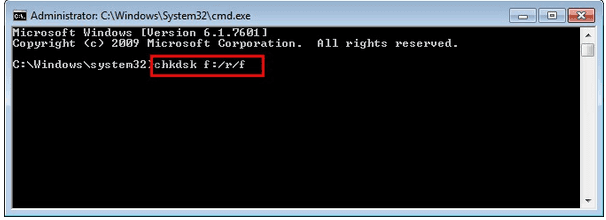
- When the command prompt window appears, you need to type a command: chkdsk /f X: and press Enter. (Replace “X” with a drive letter assigned to the USB drive.)
Once the process is completed, remove the USB drive from the computer safely.
Also Read – (11 Ways) How To Fix Please Insert A Disk Into USB Drive Without Losing Data?
#4: Update or Reinstall the Disk Drivers
Drivers enable the drive to communicate with each other. So, in case you are using corrupted or outdated drivers, the system might find difficulty scanning and repairing the drives.
In such a situation, I’ll suggest you update and reinstall the USB drivers to fix this problem.
Here’s how to update/reinstall the drivers:
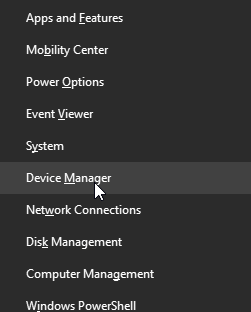
Step 1: Firstly, right-click the Start button and choose Device Manager.
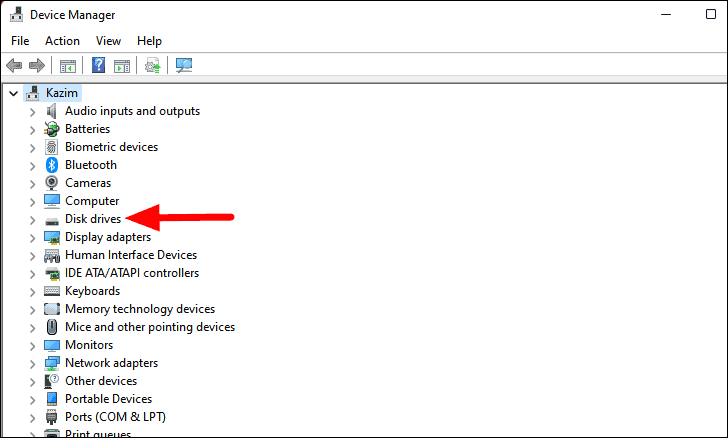
Step 2: In the device manager Window, you need to expand the Disk drives option.
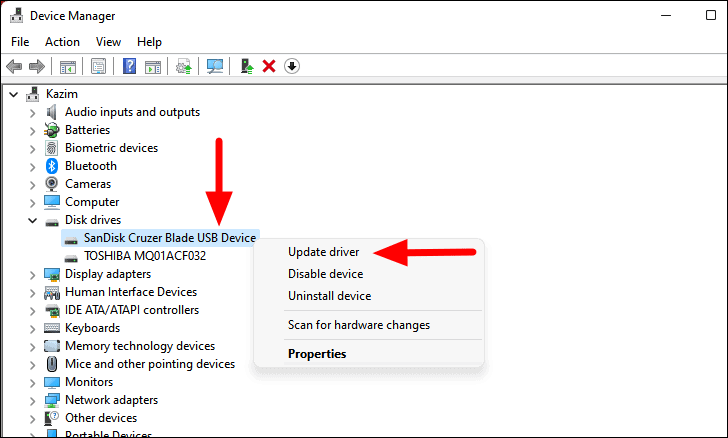
Step 3: Next, find your USB drive and right-click on it.
- If you need to update your USB drivers then choose Update driver option & follow the given instructions to update the drivers.
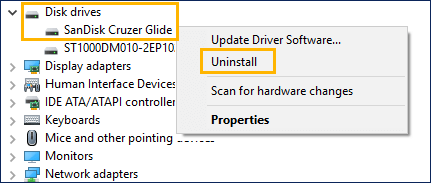
- However, if you want to reinstall the disk drivers, then you need to choose the Uninstall Device option and then click Uninstall to confirm the action.
Step 4: Once the drivers are uninstalled successfully, just restart your computer. After restarting, the Windows will automatically reinstall the drivers.
#5: Format the Drive To Fix Scanning And Repairing Stuck
If none of the above-mentioned solutions help to fix error checking USB drive scanning and repairing stuck, formatting the drive may be the last resort.
Though, formatting the drive will erase all data from the USB drive, so make sure to back up your important files before executing this method.
To format the USB drive, you need to follow the below steps carefully:
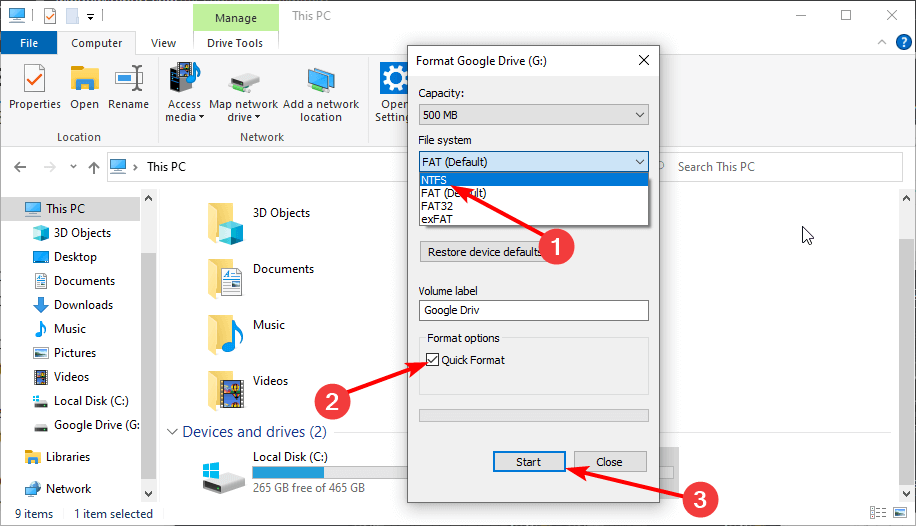
- Open the File Explorer, find your USB drive & choose the “Format” option.
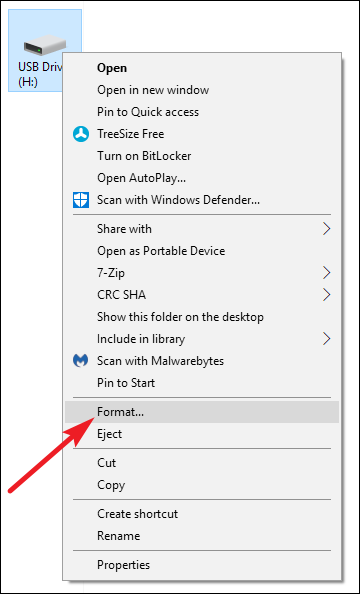
- Now, you need to choose the desired file system (e.g., FAT32, NTFS), and make sure to check the Quick Format
- At last, click on the “Start” button to begin the formatting process.
After formatting your storage drive successfully, hope your problem will be solved an you’ll able run scanning and repair process on error error-checking tool without any issues.
In case, Windows was unable to complete the format then you can simply apply the solutions mentioned here.
How To Recover Lost Or Deleted Data From External Storage Devices?
After fixing the scanning and repairing USB drive stuck, you will surely encounter a data loss situation. However, if you have a backup of your USB data then it’s good but if not then you can use our professionally recommended USB Drive Data Recovery Tool.
This software can help you recover your lost, deleted, corrupt, missing, formatted or inaccessible data from USB with ease. Not only recovers data from USB but all sorts of data storage devices such as – external hard drives, memory cards, and many more.
It scans your whole storage media and rescues the files from it effectively. No matter whether you have lost your files due to accidental deletion, drive corruption, or formatting, this powerful tool can retrieve them in no time.
emid emid
emid
* Free version of the program only scans and previews recoverable items.
You can simply download & install this program on your Windows or Mac system from the below-mentioned buttons and simply follow the below user guide to know how to use this tool.
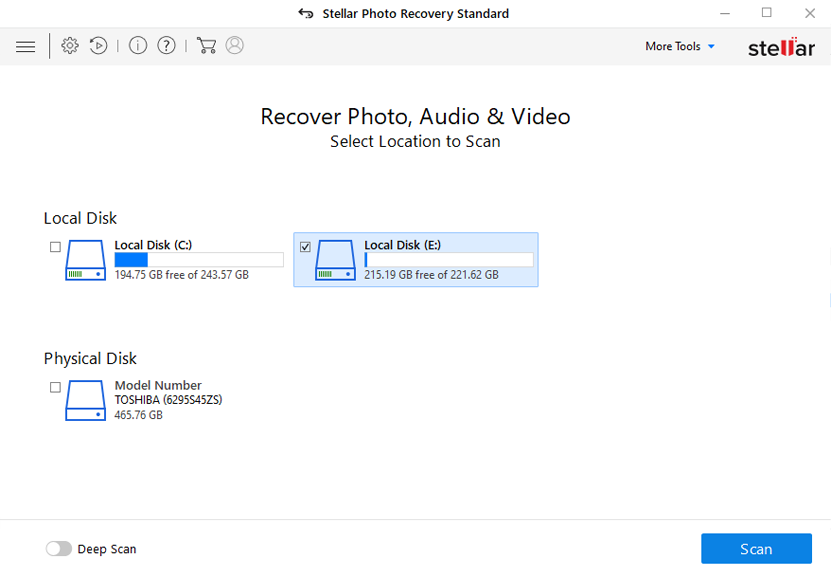
Step 1: Select Desired Location
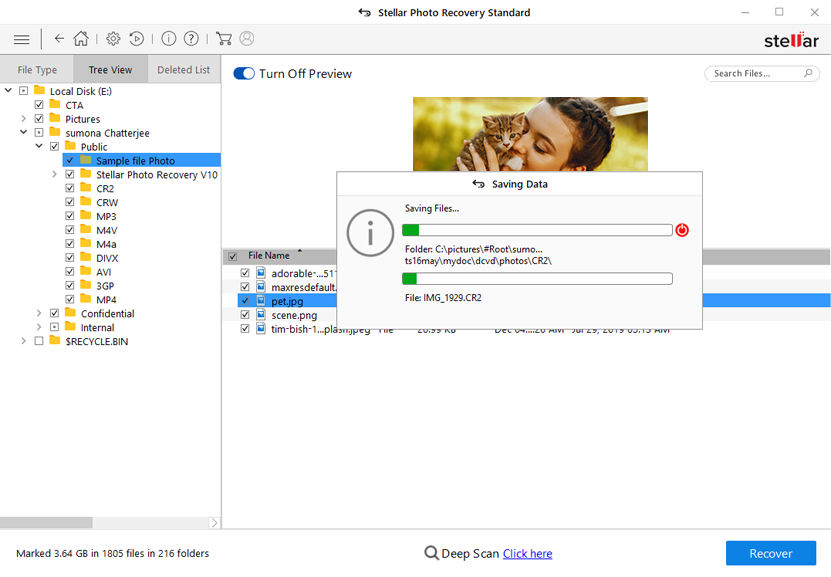
Firstly, select the drive, external media or volume from which you want to recover deleted media files. After selecting, click on 'Scan'.
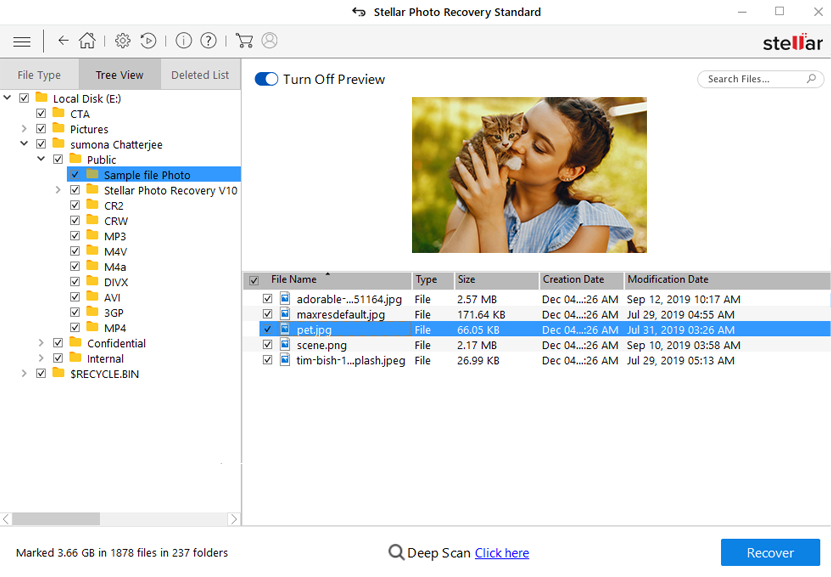
Step 2: Preview Recovered Media Files
Next, you can preview the recoverable media files after the scanning process is completed.
Step 3: Recover Media Files
Lastly, you can select the images, audio, video files you want to restore and click on 'Recover' option to save them at the location you want.
Watch this Youtube video guide to know the workarounds to fix the error checking USB drive scanning and repairing stuck problem.
Also Read – 6 Fixes For “Windows Detected A Hard Disk Problem” Error
FAQ [Frequently Asked Questions]
If your system is in the scanning & repairing process of the drive then the process may take approximately 2 hours. However, the exact time duration depends on the size of your drive and the errors found in it.
You can simply disable an automatic drive by checking process in the Automatic Repair.How Long Does A Drive Scan And Repair Take?
Can I Stop Scanning And Repairing The Drive?
Bottom Line
I hope after reading this helpful guide, you must have got enough knowledge to troubleshoot error checking USB drive scanning and repairing stuck issue.
After fixing this error, if you recognize any data loss in the USB drive then you can use USB Drive Data Recovery Tool.
That’s it!

Taposhi is an expert technical writer with 5+ years of experience. Her in-depth knowledge about data recovery and fascination to explore new DIY tools & technologies have helped many. She has a great interest in photography and loves to share photography tips and tricks with others.